This Windows Installer Installs Linux

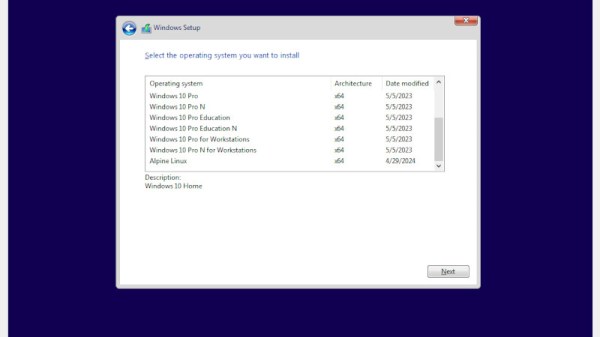
It may be a very long time since some readers have installed a copy of Windows, but it appears at one point during the installation there’s a step that asks you which OS version you would like to install. Normally this is populated by whichever Windows flavours come on the install medium, but [Naman Sood] has other ideas. How about a Windows installer with Alpine Linux as one of the choices? Sounds good to us.

You can see it in action in the video below the break. Indeed Alpine Linux appears as one of the choices, followed by the normal Windows licence accept screen featuring the GPL instead of any MS text. The rest of the installer talks about installing Windows, but we can forgive it not expecting a Linux install instead.

So, the question we’re all asking is: how is it done? The answer lies in a WIM file, a stock Windows image which the installer unpacks onto your hard drive. The Linux distro needs to be installable onto an NTFS root partition, and to make it installable there’s a trick involving the Windows pre-installation environment.

This is an amusing hack, but the guide admits it’s fragile and perhaps not the most useful. Even so, the sight of Linux in a Windows installer has to be worth it.

Continue reading “This Windows Installer Installs Linux”

Building A Rocket Engine From Scratch

There is a reason building a rocket engine is harder than most things you want to build. If you are building, say, a car, your goal is to not have it explode. If you are building a bomb, you want that to explode. But a rocket engine needs to explode just enough and not a bit more. That’s tough, as [Ryan Kuhn] discovered. He’s behind ABL’s E2 rocket, a LOX/kerosene engine for small vehicle launches. You can catch a video of the engine’s qualification tests below.

[Ryan] shares many of the problems encountered from many problems, each requiring finetuning of the design. True, there are plenty of publicly available NASA documents about what works and doesn’t work for rocket engines, but that can only take you so far. You can’t learn to bowl by reading about bowling, and you can’t design a successful rocket on paper just by reading about what others have done.

Continue reading “Building A Rocket Engine From Scratch”

A beehive sits on bricks with an outdoor-rated box full of electronics to monitor the hive.

Hive Monitor Is The Bee’s Knees

Beekeeping is quite the rewarding hobby. There’s delicious honey and useful wax to be had, plus you get the honor of knowing that you’re helping to keep the bee population surviving and thriving. [Ben Brooks] likes to keep tabs on the hive, but doesn’t like the idea of opening it up more often than necessary. After a couple of beekeeping rodeos, [Ben] decided to build his own tracker to get reports on the health and the activity of the hive through Home Assistant.

A white outdoor-rated box opened to reveal electronics to monitor a beehive.This hive tracker features a light sensor, a temperature sensor, and three strain gauges to measure the weight. There would be four, but a mouse decided to take a bite of the wires in the most nightmarish place to repair.

Everything runs off of an ESP32, and there’s an external antenna involved because the hive is nearly out of Wi-Fi range. The strain gauges are the affordable bathroom-scale type, and [Ben] has extras for if and when the number of hives goes up.

We like the combination of hard work and simplicity going on here — [Ben] milled and drilled the PCB himself, and used phone plugs to connect the temperature and weight sensors. Unfortunately, the plugs make the strain gauges a little finicky, so [Ben] says he would probably use screw terminals next time, or might be soldering the wires sooner rather than later. Consider this one a work in progress, and keep watching for updates as [Ben] works out the kinks.

Interested in beekeeping, but don’t want to build a traditional hive? Check out this beehive in a bottle.

This Robot Picks Locks, If You’re Very Patient

We all know the Hollywood trope of picking a lock with a paperclip, and while it certainly is doable, most reputable locks require slightly more sophisticated tools to pick effectively. That’s not to say that wire is off the table for locksports, though, as this cool lock-picking robot demonstrates.

The basics behind [Sparks and Code]’s design are pretty simple. Locks are picked by pushing pins up inside the cylinder until they line up with the shear plane, allowing the cylinder to turn. Normally this is done a pin at a time with a specialized tool and with a slight bit of torque on the cylinder. Here, tough, thin, stiff wires passing through tiny holes in a blade shaped to fit the keyway are used to push all the pins up at once, eliminating the need to keep tension on the cylinder to hold pins in place.

Sounds simple, but in practice, this looks like it was a nightmare. Getting five wires to fit into the keyway and guiding them to each pin wasn’t easy, nor was powering the linear actuators that slide the wires in and out. Applying torque to the lock was a chore too; even though tension isn’t needed to retain picked pins, the cylinder still needs to rotate, which means moving the whole picking assembly. But the biggest problem by far seems to be the fragility of the blade that goes into the keyway. SLA might not be the best choice here; perhaps the blade could be made from two thin pieces of aluminum with channels milled on their faces and then assembled face-to-face.

The robot works, albeit very slowly. This isn’t [Sparks and Code]’s first foray into robot lock picking. His previous version attempted to mimic how a human would pick a lock, so this is really thinking outside the box.

Continue reading “This Robot Picks Locks, If You’re Very Patient”

Dune 3D: Open Source 3D Parametric Modeler From The Maker Of Horizon EDA

When coming from the world of Autodesk and kin’s proprietary CAD solutions, figuring out which FOSS 3D CAD solution is the right one can be a real chore, as none of them are on the same level. This is what the author of the Horizon EDA software – [Lukas K.] – struggled with as well when he decided to make his own 3D CAD package, called Dune 3D. Per the documentation for Dune 3D, it’s effectively the solver and workflow from SolveSpace, the Open CASCADE geometry kernel and the user interface from Horizon EDA wrapped up into a single package.

So why not just use FreeCAD or contribute to it? [Lukas]’s main gripes appear to be the issues with the topological naming problem (TNP) in FreeCAD, as well as the modal sketcher that’s limited to 2D, with no constraints in 3D for extrusions. With the recent version 1.1 release it seems to be picking up new features and fixes, and installing it is very easy on Windows with an installer. For Arch there’s an AUR package, and other Linux seems to get a Flatpak if you’re not into building the software yourself.

As for the UI, it’s got a definite MacOS vibe to it, with most of the functionality hidden from the main view. Fortunately some tutorials are available to get you started, but it remains to be seen where Dune 3D lands compared to FreeCAD, OnShape and others. As a sidenote, the name is probably not going to help much when asking Google for answers, courtesy of a certain vaguely well-known book with associated movies and series.

RISC OS Gets An Update

There should be rejoicing among fans of the original ARM operating system this week, as the venerable RISC OS received its version 5.30 update. It contains up-to-date versions of the bundled software as well as for the first time, out-of-the-box WiFi support, and best of all, it can run on all Raspberry Pi models except the Pi 5. If you’ve not encountered RISC OS before, it’s the continuing development of the OS supplied with the first ARM product, the Acorn Archimedes. As such it’s a up-to-date OS but with an interface that feels like those of the early 1990s.

We like RISC OS here, indeed we reviewed the previous version this year, so naturally out came the Hackaday Pi 3 and an SD card to run it on. It’s as smooth and quick as it ever was, but sadly try as we might, we couldn’t get the Pi’s wireless interface to appear in the list of available network cards. This almost certainly has more to do with us than it does the OS, but it would have been nice to break free from the tether of the network cable. The included Netsurf 3.11 browser is nippy but a little limited, and just as it was during our review, sadly not capable of editing a Hackaday piece or we’d be using it to write this.

It’s great to see this operating system still under active development, and we can see that it so nearly fulfills our requirement here for a lightweight OS on the road. For those of us who used the original version, then called Arthur, it’s a glimpse of how desktop computing could, or perhaps even should, have been.

Screenshot of the GitHub Marketplace action listing, describing the extension

Giving Your KiCad PCB Repository Pretty Pictures

Publishing your boards on GitHub or GitLab is a must, and leads to wonderful outcomes in the hacker world. On their own, however, your board files might have the repo look a bit barren; having a picture or two in the README is the best. Making them yourself takes time – what if you could have it happen automatically? Enter [kicad-render], a GitHub&GitLab integration for rendering your KiCad projects by [linalinn].

This integration makes your board pictures, top and bottom view, generated on every push into the repo – just embed two image links into your README.md. This integration is made possible thanks to the new option in KiCad 8’s kicad-cli – board image generation, and [linalinn]’s code makes KiCad run on GitHub/GitLab servers.

For even more bling, you can enable an option to generate a GIF that rotates your board, in the style of that one [arturo182] demo – in fact, this integration’s GIF code was borrowed from that script! Got a repository with many boards in one? There’s an option you could make work for yourself, too.

All you need to do is to follow a couple of simple steps; [linalinn] has documented both the GitHub and GitLab integration. We’ve recently talked about KiCad integrations in more detail, if you’re wondering what else your repository could be doing!