Turn A PC On With A Knock And An ATTiny

knockAttiny

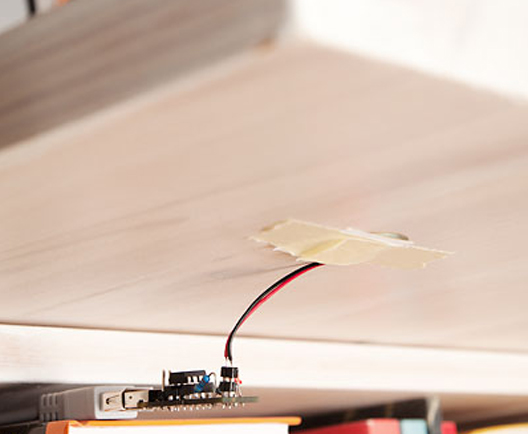
Pressing the power button on your computer usually isn’t too much trouble, unless your computer is stored away somewhere hard to reach. [Joonas] has been hard at work on a solution that would also impress his friends, building a knock sensor to turn on his PC.

For around $10 in parts he put together an ATTiny45 that emulates a PS/2 device, which takes advantage of his computer’s ability to boot upon receiving PS/2 input. The build uses a Piezo buzzer and a 1M Ohm resistor as a knock sensor exactly as the official Arduino tutorial demonstrates, and one of those PS/2-to-USB adapters that are most likely lurking in the back corner of every drawer in your office.

[Joonas] used AVRweb to disable the 8X clock divider so there’d be enough clock cycles for PS/2 communication, then loaded some test code to make sure the vibrations were being detected correctly. You can check out his Github for the final code here, and stick around after the break for a quick video demo. Then check out a similar hack with [Mathieu’s] home automation knock sensor.

Continue reading “Turn A PC On With A Knock And An ATTiny”

CAN Hacking: Introductions

We’re introducing a new series on CAN and automotive hacking. First, we’ll introduce CAN and discuss how in-vehicle networks work.

In 1986, Bosch introduced the Controller Area Network protocol. It was designed specifically for in-vehicle networks between automotive controllers. CAN became a popular option for networking controllers in automotive, industrial, and robotics applications. Starting in 2008, all vehicles sold in the US must use CAN.

Modern vehicles are distributed control systems, with controllers designed to handle specific tasks. For example, a door control module would take care of locks and windows. CAN allows these controllers to communicate. It also allows for external systems to perform diagnostic tasks by connecting to the in-vehicle network.

Some examples of CAN communication in a vehicle include:

  • The engine control module sending the current engine speed to the instrument cluster, where it is displayed on a tachometer.
  • The driver’s door controller sending a message to another door controller to actuate the window.
  • A firmware upgrade for a controller, sent from a diagnostics tool.

CAN is usually used with little or no security, except for the obscurity of the communications. We can use CAN to USB interfaces to listen to the traffic, and then decode it. We can also use these tools to send forged messages, or to perform diagnostic actions. Unfortunately, most of the tools for dealing with CAN are proprietary, and very expensive. The diagnostics protocols are standards, but not open ones. They must be purchased from the International Organization for Standardization.

Next time, we’ll get into the structure of CAN frames, and how traffic is encoded on the bus.

 [Image via Wikipedia]

CAN Hacking

The Most Minimal Homebrew Computer

Perfection is achieved not when there is nothing more to add, but when there is nothing left to fail. Going by that metric, [Stian]’s three-chip 6502 homebrew computer is the epitome of perfection. It’s a real, working, homebrew retrocomputer using only three chips: a CPU, some RAM, and a microcontroller to bootstrap the computer and provide a video output,

The key to this minimalist build is having the entire boot process controlled by an ATMega16 microcontroller, This interfaces to the 6502 through a dual-port SRAM, a 1 kilobyte Cypress CY7C130. This dual-port RAM allows the CPU and microcontroller to access the same bit of memory, making it easy to bootstrap a computer from a bit of AVR code.

Output is provided with [Stian]’s ATMega video text generator putting a 37×17 characters on any television with an RCA jack. While input isn’t handled yet, [Stian] says it should be possible with his AVR PS/2 keyboard library.

While other 6502 homebrew computers such as [Quinn Dunki] Veronica can reach unparalleled heights of complexity, there is a lot to be said about the minimalism of [Stian]’s three-chip computer. With some clever coding and a modified parts list, it may well be possible to put a retrocomputer in the hands of everyone with a bare minimum of cost and parts.

Introducing The Shapeoko 2

For all the 3D printers that hit the Hackaday tip line, it’s surprising we don’t see more CNC routers. They’re arguably more useful tools, and with the ability to mill wood, plastic, and non-ferrous metals, open up the door to a whole bunch more potential builds. One of the most popular – and certainly one of the least expensive – CNC routers out there, the Shapeoko, just received a huge update that makes this minimal machine even more capable.

The new Shapeoko 2 keeps the same V wheel on an aluminium extrusion design with Makerslide, but fixes a few problems that limited the original Shapeoko. There’s a larger work area on this version, and the Y axes feature dual stepper motors. The biggest feature, we think, is the ability to handle materials larger than the machine itself thanks to its open front and back.

The Shapeoko 2 is available in two versions, a $300 mechanical kit that requires you to go out and get some motors, a power supply, and a grblShield, the full version, for $650, includes everything you’ll need to start routing wood metal and plastic at home.

Adventures In Hackerspacing: Freeside Atlanta, Part II

advInHSLayout00

This week on Adventures in Hackerspacing, Freeside Atlanta Part II: Hacking the Hackerspace!

After learning about the culture behind the space, I was eager to ask hackerspace veterans [Alan] and [Steven] about nuts and bolts, about behind-the-scenes crucial decisions, and one question in particular: What’s the most important requirement for a hackerspace? [Alan] jumped in with this response:

Number one by and far is a willing landlord. I think if you have a willing landlord everything else is incidental. You make it hard on yourself if you are on the second story, but take the second story if you have a willing landlord.

That wasn’t the answer I was expecting, but when you look around Freeside, it starts to make sense…

Continue reading “Adventures In Hackerspacing: Freeside Atlanta, Part II”

Piano Repurposed As A Resonant Synth Speaker

piano-synth

[Richard] recently rediscovered some files from a hack he did back in 2004. He was experimenting with exciting piano strings via electromagnetic fields. The idea shares some elements with the self tuning piano we saw back in 2012. Piano strings, much like guitar strings, are made of steel alloys. This means they create electricity when vibrated in a magnetic field. This is the basic principle upon which electric guitar pickups are built. The idea also works in reverse. The strings will vibrate in response to a modulated electromagnetic field. Anyone who has seen an E-bow knows how this can be applied to the guitar. What about the piano?

[Richard] started with the Casio CZ-101, a classic synth in its own right. The Casio’s output was run through a Peavy 100 watt amplifier. The amplified output was then used to drive custom coils mounted on a piano. The coils had to be custom wound to ensure they would be compatible with the 4 – 8 ohm impedance expected by the amplifier. [Richard] ended up winding the coils to 28 ohms. Six of these coils in parallel put him just over the 4 ohm mark. The coils effectively turned the piano into a giant speaker for the synth. In [Richard’s] write-up (word doc link) he mentions that the strings basically act as a giant comb filter, each resonating strongly in response to frequencies in its harmonic series.

The results are rather interesting. The slow attack of the magnetic fields coupled with the synth’s patch results in a surprising variety of sound. The three examples on [Richard’s] blog vary from sounding like a power chord on a guitar to something we’d expect to find in an early horror movie. We would love to see this idea expanded upon. More efficient coils, and more coils in general would add to the effect. The coils on various string groups could also be switched in and out of the system using MIDI control, allowing for even more flexibility. Continue reading “Piano Repurposed As A Resonant Synth Speaker”