DIY USB-C Touch Monitor Is All Polished Brass

We’ve known for a while that you can buy interface boards to turn old laptop screens into standalone monitors, but complete sets with 4K panels and control boards are also now becoming widely available on sites like eBay and AliExpress, and prices are dropping. These sets are also available with low-profile connectors like micro HDMI and USB-C, which allow for some very compact builds.

[Matt] from [DIY Perks] used one of these sets to build a slimline USB-C monitor with a brass enclosure. Video after the break. The enclosure consists of brass sheets and U-channel pieces soldered and screwed together. There is quite a bit of residue and discoloration after soldering, but this was removed with a bit of sanding and polishing. A pair of adjustable legs were added to allow it to stand on its own, and an additional chamber on the back holds the control board, an old smartphone battery, and a battery protection circuit. [Matt] also added a pair of removable speakers, which are sealed speaker units covered in brass mesh and plate.

We’ve covered several DIY monitor builds over the years, and they are perfect as an additional monitor for a laptop, or for pairing with the Raspberry Pi 400 with its integrated keyboard. We really [Matt]’s builds, which include a smartphone-based 4K projector, and a very effective cooling system for an expensive DSLR camera. Continue reading “DIY USB-C Touch Monitor Is All Polished Brass”

The Sony ScopeMan, Possibly The Best Product They Never Made

From the perspective of a later decade it’s sometimes quaint and amusing to look back at the technological objects of desire from times past. In the 1980s for example a handheld television was the pinnacle of achievement, in a decade during which the Walkman had edged out the transistor radio as the pocket gadget of choice it seemed that visual entertainment would surely follow. Multiple manufacturers joined the range of pocket TVs on offer, and Sony’s take on the format used a flattened CRT with an angled phosphor screen viewed from behind through its glass envelope. [Niklas Fauth] took one of these Sony Watchman devices and replaced its TV circuit board with one that turned it into a vector display. The Sony Scopeman was born!

The schematic is deceptively simple, with an ESP32 receiving audio via Bluetooth and driving the deflection coils through a pair of op-amps and a set of driver transistors. These circuits are tricky to get right though, and in this he acknowledged his inspiration. Meanwhile the software has two selectable functions: a fairly traditional X-Y vector ‘scope display and a Lorenz attractor algorithm. And of course, it can also display a vector version of our Wrencher logo.

We like the Scopeman, in fact we like it a lot. There may be some discomfort for the retro tech purist in that it relies on butchering a vintage Watchman for its operation, but we’d temper that with the observation that the demise of analogue broadcast TV has rendered a Watchman useless, and also with the prospect that a dead one could be used for a conversion project.

[Niklas] has had more than one project appear on these pages, a memorable example being his PCB Tesla coil.

The Smallest Large Display Is Projected Straight Onto Your Retina

For most of human history, the way to get custom shapes and colors onto one’s retinas was to draw it on a cave wall, or a piece of parchment, or on paper. Later on, we invented electronic displays and used them for everything from televisions to computers, even toying with displays that gave the illusion of a 3D shape existing in front of us. Yet what if one could just skip this surface and draw directly onto our retinas?

Admittedly, the thought of aiming lasers directly at the layer of cells at the back of our eyeballs — the delicate organs which allow us to see — likely does not give one the same response as you’d have when thinking of sitting in front of a 4K, 27″ gaming display to look at the same content. Yet effectively we’d have the same photons painting the same image on our retinas. And what if it could be an 8K display, cinema-sized. Or maybe have a HUD overlay instead, like in video games?

In many ways, this concept of virtual retinal displays as they are called is almost too much like science-fiction, and yet it’s been the subject of decades of research, with increasingly more sophisticated technologies making it closer to an every day reality. Will we be ditching our displays and TVs for this technology any time soon?

Continue reading “The Smallest Large Display Is Projected Straight Onto Your Retina”

The Pocket Emulator That Will Fit In Your Pocket

If there’s one thing tiny Linux Systems on a Chip are good for, it’s emulation. There’s nothing like pulling out an emulation console on the bus for a quick game of old-school NES Tetris, or beating the next level in Super Mario World. This is the smallest emulation console ever. It’ll fit in your pocket, and it has a bright, vibrant screen. It doesn’t get better than this.

This project is an improvement on two projects, both of which are some of the top projects on hackaday.io, the best place on the Internet for hacks and builds. The Keymu is (or was, at the time) the smallest emulation console ever, built as a miniaturized version of the Game Boy Advance SP in a 3D printed case and powered by the Intel Edison. The Edison doesn’t exist anymore, so after that development moved over to the Funkey Zero, a tiny console built around the AllWinner V3s chip and a 240×240 display. Both of these are tiny, tiny consoles, but as silicon gets better there’s always better options, so it’s back to the drawing board.

The design of the Funkey Project is again built on the AllWinner V3S SoC with 64MB of DDR2 DRAM. There’s a 1.5″ display with 240×240 resolution, and of course this retro emulation console retains the classic and very useful clamshell form factor of the famous Game Boy Advance SP.

Already, this project is in the works and it’s shaping up to be one of the most popular projects on hackaday.io ever. Everyone wants an emulation console, and this is the smallest and tiniest one yet. Whether or not this project can carry through to production is another matter entirely, but we’re eager to find out.

Unphotogenic Lighting As A Feature

Have you ever taken a picture indoors and had unsightly black bars interrupt your otherwise gorgeous photo? They are caused by lighting which flickers in and out in its normal operation. Some people can sense it easier than others without a camera. The inconsistent light goes out so briefly that we usually cannot perceive it but run-of-the-mill camera phones scan rows of pixels in sequence, and if there are no photons to detect while some rows are scanned, those black bars are the result. Annoying, right?

What if someone dressed that bug of light up as a feature? Instead of ruining good photos, researchers at the University of California-San Diego and the University of Wisconsin-Madison have found out what different frequencies of flicker will do to a photograph. They have also experimented with cycling through red, green, and blue to give the effect of a poorly dubbed VHS.

There are ways an intelligent photographer could get around the photo-ruining effect with any smartphone. Meanwhile DSLR cameras are already immune and it won’t work in sunlight, so we are not talking about high security image protection. The neat thing is that this should be easy to replicate with some RGB strips and a controller. This exploits the row scanning of new cameras, so some older cameras are immune.

Portable Photo Booth Named Buzz

We’re all used to posing for a picture — or a selfie — but there’s something about photo booths that make getting your photo taken an exciting and urgent affair. To make this experience a bit easier to tote about, Redditor [pedro_g_s] has laboriously built, from the ground up, a mobile photo booth named Buzz.

He needed a touchscreen, a Raspberry Pi, almost definitely a webcam, and a 3D printer to make a case — although any medium you choose will do — to build this ‘booth.’ That said, he’s built the app in a way that a touchscreen isn’t necessary, but carting around a mouse to connect to and operate your portable photo booth seems a bit beside the point. On the back end, he used Electron to code the photo booth app, React helped him build a touchscreen UI, and Yarn kept the necessary dependencies in order.

Operation is simple, and every time a photo is taken it is sent to and collated within a previously set-up email service. To set it up, [pedro_g_s] is here to guide you through the process.

Continue reading “Portable Photo Booth Named Buzz”

Real-Time Polarimetric Imager From 1980s Tech

It’s easy to dismiss decades old electronics as effectively e-waste. With the rapid advancements and plummeting prices of modern technology, most old hardware is little more than a historical curiosity at this point. For example, why would anyone purchase something as esoteric as 1980-era video production equipment in 2018? A cheap burner phone could take better images, and if you’re looking to get video in your projects you’d be better off getting a webcam or a Raspberry Pi camera module.

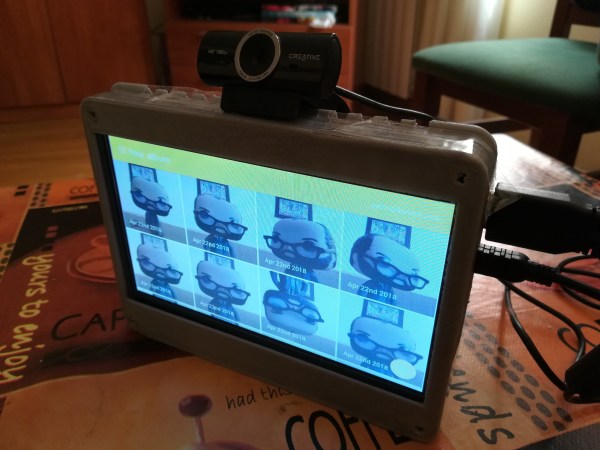
But occasionally the old ways of doing things offer possibilities that modern methods don’t. This fascinating white paper from [David Prutchi] describes in intricate detail how a 1982 JVC KY-1900 professional video camera purchased for $50 on eBay was turned into a polarimetric imager. The end result isn’t perfect, but considering such a device would normally carry a ~$20,000 price tag, it’s good enough that anyone looking to explore the concept of polarized video should probably get ready to open eBay in a new tab.

Likely many readers are not familiar with polarimetric imagers, it’s not exactly the kind of thing they carry at Best Buy. Put simply, it’s a device that allows the user to visualize the polarization of light in a given scene. [David] is interested in the technology as, among other things, it can be used to detect man-made materials against a natural backdrop; offering a potential method for detecting mines and other hidden explosives. He presented a fascinating talk on the subject at the 2015 Hackaday SuperConference, and DOLpi, his attempt at building a low-cost polarimetric imager with the Raspberry Pi, got him a fifth place win in that year’s Hackaday Prize.

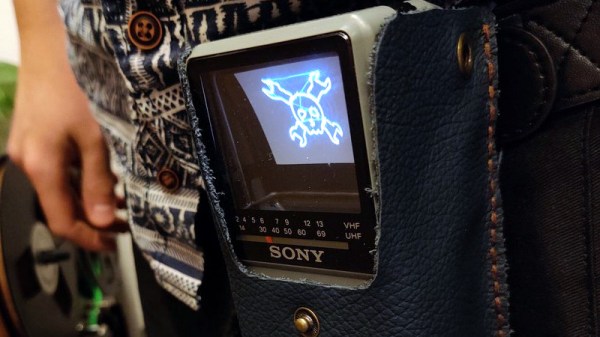
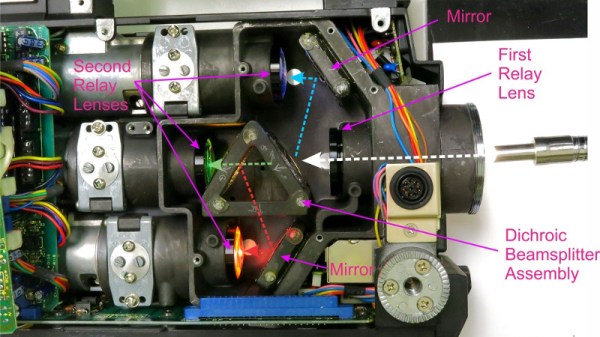
While he got good results with his Raspberry Pi solution, it took several seconds to generate a single frame of the image. To be practical, it needed to be much faster. [David] found his solution in an unlikely place, the design of 1980’s portable video cameras. These cameras made use of a dichroic beamsplitter to separate incoming light into red, blue, and green images; and in turn, each color image was fed into a dedicated sensor by way of mirrors. By replacing the beamsplitter assembly with a new 3D printed version that integrates polarization filters, each sensor now receives an image that corresponds to 0, 45, and 90 degrees polarization.

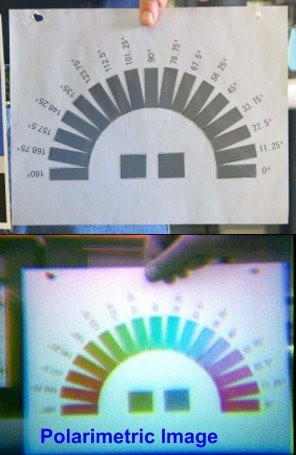
With the modification complete, the camera now generates real-time video that shows the angle of polarization as false color. [David] notes that the color reproduction and resolution is quite poor due to the nature of 30+ year old video technology, but that overall it’s a fair trade-off for running at 30 frames per second.

In another recent project, [David] found a way to hack optics onto a consumer-level thermal imaging camera. It’s becoming abundantly clear that he’s not a big fan of leaving hardware in an unmodified state.