Still Up And Coming: Non-Planar FDM 3D Printing With 3 Or 6 Axes

Printing the non-planar PLA part on top of the non-planar side of the PETG part. (Credit: Michael Wüthrich)

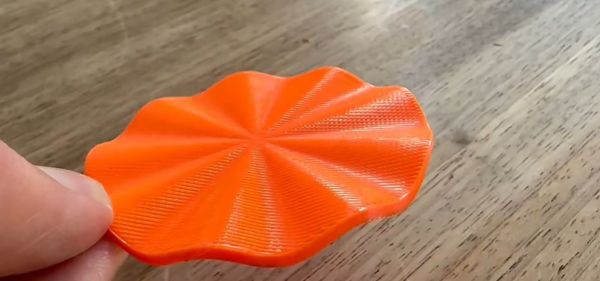
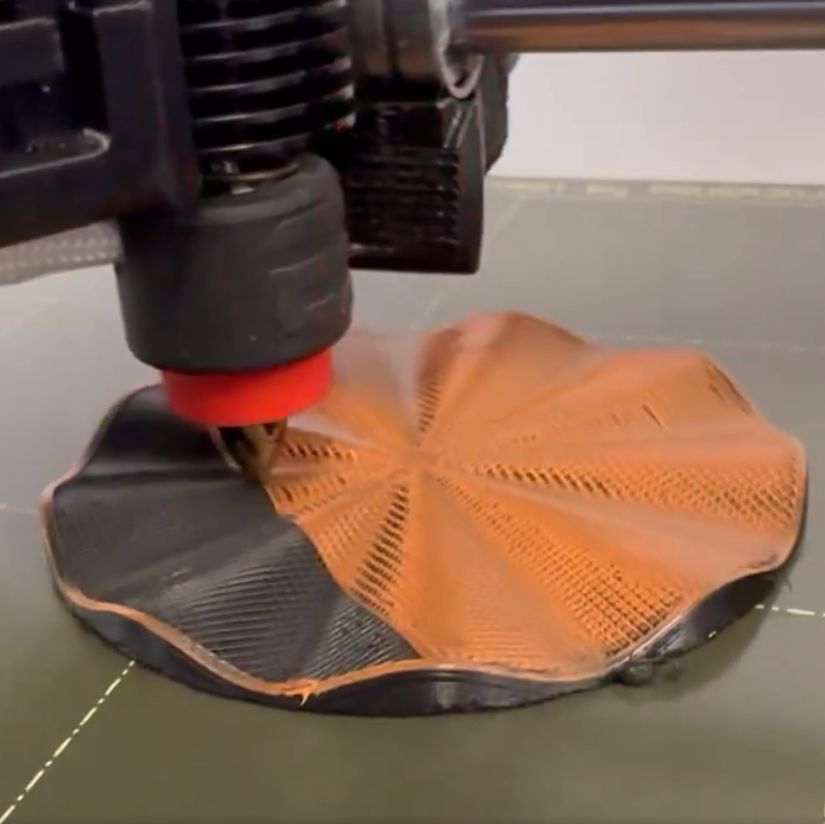
Most of the time FDM 3D printing involves laying down layers of thermoplastics, but the layer lines also form the biggest weakness with parts produced this way. Being able to lay out the lines to follow the part’s contours can theoretically strengthen the part and save material in the process. Recently, [Michael Wüthrich] demonstrated an approach that uses a modified Prusa Mini FDM printer to first lay out a part in PETG using non-planar printing, after which this PETG part was used to print on top of in PLA, effectively using the PETG as a ‘printbed’ from which the PLA can be easily removed and leaving the PLA part as fully non-planar on both sides.

The modification to the Prusa Mini printer is covered on Printables along with the required parts. The main change is to give the nozzle as much clearance as possible, for which [Michael] uses the E3D Revo belt nozzle. This nozzle requires a custom holder for the Prusa Mini. After this the printer is ready for non-planar printing, but as [Michael] notes in the Twitter thread, he did not use a slicer for this, as none exists. Instead he used Matlab, a custom script and a lot of manual labor.

Continue reading “Still Up And Coming: Non-Planar FDM 3D Printing With 3 Or 6 Axes”

More Microwave Metal Casting

If you think you can’t do investment casting because you don’t have a safe place to melt metal, think again. Metal casting in the kitchen is possible, as demonstrated by this over-the-top bathroom hook repair using a microwave forge.

Now, just because it’s possible doesn’t mean it’s advisable. There are a lot better ways to fix something as mundane as a broken bathroom hook, as [Denny] readily admits in the video below. But he’s been at the whole kitchen forging thing since building his microwave oven forge, which uses a special but easily constructed ceramic heat chamber to hold a silicon carbide crucible. So casting a replacement hook from brass seemed like a nice exercise.

The casting process starts with a 3D-printed model of the missing peg, which gets accessories such as a pouring sprue and a thread-forming screw attached to it with cheese wax. This goes into a 3D-printed mold which is filled with a refractory investment mix of plaster and sand. The green mold is put in an air fryer to dry, then wrapped in aluminum foil to protect it while the PLA is baked out in the microwave. Scrap brass gets its turn in the microwave before being poured into the mold, which is sitting in [Denny]’s vacuum casting rig.

The whole thing is over in seconds, and the results are pretty impressive. The vacuum rig ensures metal fills the mold evenly without voids or gaps. The brass even fills in around the screw, leaving a perfect internal thread. A little polishing and the peg is ready for bathroom duty. Overly complicated? Perhaps, but [Denny] clearly benefits from the practice jobs like this offer, and the look is pretty cool too. Still, we’d probably want to do this in the garage rather than the kitchen.
Continue reading “More Microwave Metal Casting”

Recycling Wires For Breadboarding

It is easy to take things for granted, but if you work with students, you realize that even something as simple as a breadboard needs explanation. [0033mer] recently shared a tip about how he wires both solderless breadboards and prototype boards on the cheap. Instead of buying special wires, he salvages riser cables often found in scrap from demolished buildings. These often have 200 or so thin solid wires inside. You take them apart, and, as he put it, if you have 15 feet of the stuff, that will last you the rest of your life. We hope you live longer than that, but still.

One advantage to doing this is you don’t feel bad about cutting the wires exactly to length which makes for neat boards. He has a tiny stripper that make it easy to remove the insulation during installation.

Continue reading “Recycling Wires For Breadboarding”

The Next Evolution Of The Raspberry Pi Recovery Kit

At Hackaday, the projects we cover are generally a one-off sort of thing. Somebody makes something, they post it online, we share it with our audience — rinse and repeat. If a project really captures people’s imaginations, it might even inspire a copy or two, which is gratifying for everyone involved. But on the rarest of occasions, we run across a project like [Jay Doscher]’s Recovery Kit.

To say that the Recovery Kit was an inspiration to others would be putting it mildly. Revolutionary would be more like it, as it resulted in more “Pi-in-a-Pelican” builds than we could possibly count. So it’s only natural that [Jay] would return to the well and produce a second version of his heavy-duty cyberdeck.

Continue reading “The Next Evolution Of The Raspberry Pi Recovery Kit”

Microsoft Killed My Favorite Keyboard, And I’m Mad About It

As a professional writer, I rack up thousands of words a day. Too many in fact, to the point where it hurts my brain. To ease this burden, I choose my tools carefully to minimize obstructions as the words pour from my mind, spilling through my fingers on their way to the screen.

That’s a long-winded way of saying I’m pretty persnickety about my keyboard. Now, I’ve found out my favorite model has been discontinued, and I’ll never again know the pleasure of typing on its delicate keys. And I’m mad about it. Real mad. Because I shouldn’t be in this position to begin with!

Continue reading “Microsoft Killed My Favorite Keyboard, And I’m Mad About It”

Fail Of The Week: Can An Ultrasonic Cleaner Remove Bubbles From Resin?

[Wendy] asked a very good question. Could putting liquid resin into an ultrasonic cleaner help degas it? Would it help remove bubbles, resulting in a cleaner pour and nicer end product? What we love is that she tried it out and shared her results. She purchased an ultrasonic cleaner and proceeded to mix two batches of clear resin, giving one an ultrasonic treatment and leaving the other untouched as a control.

Sadly, the test piece had considerably more surface bubbles than the untreated control, as well as a slight discoloration.

The results were interesting and unexpected. Initially, the resin in the ultrasonic bath showed visible bubbles rising to the surface which seemed promising. Unfortunately, this did not lead to fewer bubbles in the end product.

[Wendy]’s measurements suggest that the main result of putting resin in an ultrasonic bath was an increase in its temperature. Overheating the resin appears to have led to increased off-gassing and bubble formation prior to and during curing, which made for poor end results. The untreated resin by contrast cured with better color and much higher clarity. If you would like to skip directly to the results of the two batches, it’s right here at 9:15 in.

Does this mean it’s a total dead end? Maybe, but even if the initial results weren’t promising, it’s a pretty interesting experiment and we’re delighted to see [Wendy] walk through it. Do you think there’s any way to use the ultrasonic cleaner in a better or different way? If so, let us know in the comments.

This isn’t the first time people have tried to degas epoxy resin by thinking outside the box. We’ve covered a very cheap method that offered surprising results, as well as a way use a modified paint tank in lieu of purpose-made hardware.

Linux Fu: Stupid Systemd Tricks

Last time, I gave a whirlwind introduction to a very small slice of systemd. If you aren’t comfortable with systemd services, timers, and mounts, you might want to read that now. Otherwise, press on to see a few interesting uses for custom systemd units, including running a few things on a schedule and automatically mounting a Raspberry Pi Zero.

Can you do every one of these things in a different way? Of course you can. I’m not debating the relative merits of using or not using systemd. However, unless you totally control your own environment, good chance you are going to have to interact with systemd at some point.

Stupid Trick #1: Update Your IP Address

A few years ago, I talked about updating your remote DNS server with your public IP address. This lets you refer to a hostname like snoopy.hackaday.com and get back to your computer that often changes IP addresses. Sure, you can get services to do that for you, but you must either pay or agree to read ads on their site to keep your hostname going. This is all under your control. In the original post, I suggested using cron or NetworkManager to run the update script. I also hinted you could do it with systemd, but I didn’t tell you how. Let’s fix that.

Continue reading “Linux Fu: Stupid Systemd Tricks”