Macro Pad Cheap Enough To Give Away

Supercon 2022 showed that hackers are starting to come together again in Maker Faires, conventions, and festivals. [Toby Chui] plans to be one of those hackers and wants something to give to fellow attendees. Thus, the $3 Macro Pad was born.

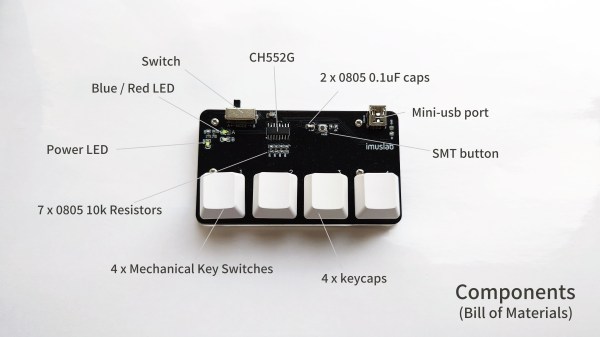
We’ve seen our fair share of macro pads, so a simple four-key pad isn’t exactly novel. However, the focus on size and cost makes it stand out. The pad is the size of a business card, making it easy to give away. For a microcontroller, [Toby] used a CH552G, which is cheap and compatible with the Arduino IDE. Although, with 10 GPIO, a matrix layout could have supported a full-sized number pad, the diodes required would have added to the cost significantly. A cheap PCB and 3d-printed base make up the device’s bulk.

[Toby] provides a handy tool for assigning keys from your browser without coding. However, the source code is on GitHub if you want to develop a more complicated scheme. This isn’t the first time we’ve featured the CH552 chip, and it likely won’t be the last.

Continue reading “Macro Pad Cheap Enough To Give Away”

Paraffin Oil And Water Dot Matrix Display

In preparation for Makerfaire, [hwhardsoft] needed to throw together some demos. So they dug deep and produced this unique display.

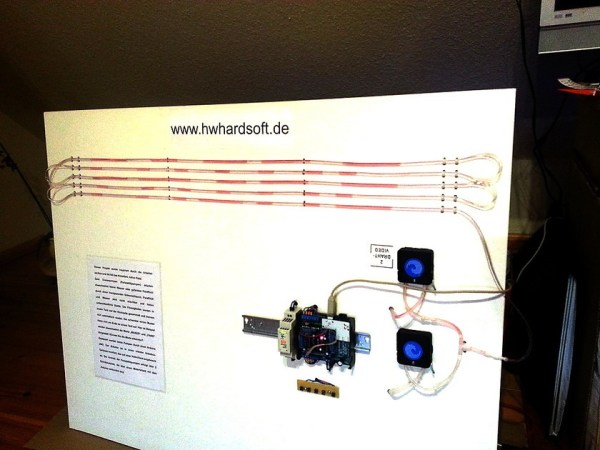
The display uses two synchronized peristaltic pumps to push water and red paraffin through a tube that switches back over itself in a predictable fashion. As visible in the video after the break, the pumps go at it for a few minutes producing a seemingly random pattern. The pattern coalesces at the end into a short string of text. The text is unfortunately fairly hard to read, even on a contrasting background. Perhaps an application of UV dye could help?

Once the message has been displayed, the water and paraffin drop back into the holding tank as the next message is queued up. The oil and water separate just like expected and a pump at the level of each fluid feeds it back into the system.

We were deeply puzzled at what appeared to be an Arduino mounted on a DIN rail for use in industrial settings, but then discovered that this product is what [hwhardsoft] built the demo to sell. We can see some pretty cool variations on this technique for art displays.

Continue reading “Paraffin Oil And Water Dot Matrix Display”

Powerwheels Jeep

Powerwheels Racing Series In Detroit

[Transistor-Man] and the gang finally got around to documenting their experience at the Detroit Makerfaire 2014 and the Powerwheels racing series. They weren’t planning on entering, but in a last-minute decision they decided to see if they could whip up an entry just over one week before the competition! They did — and it’s awesome. They call it the Chibi-Atomic-Jeep.

As the competition name implies, they had to base the vehicle off of a Powerwheels frame. Bunch of steel tubing, some TIG welding and a nice paint job, and they had the base frame of their vehicle. At the heart of it? An alternator from a van — surprisingly powerful and easy to control. They used cheap 8″ wheels from Harbor Freight Tools — they worked great, just didn’t last very long… By the time the races were over, they went through NINE of these tires. Good thing they’re cheap!

The most impressive part of the build is the gears. They made them using a water-jet cutter at the local hobby shop and a Bridgeport mill with an indexing head — not an easy task to complete!

Continue reading “Powerwheels Racing Series In Detroit”

1.37″ CRT Restored By Hacklab For Miniature MAME Cabinet

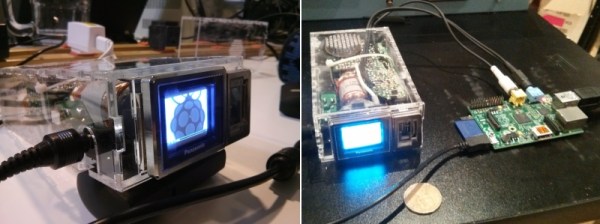
For $5, [William] of Toronto’s Hacklab hackerspace got a hold of one of the smallest CRT screens ever made – about the size of a large coin. Over the course of a couple sessions – including a public hack boothside at their Mini Makerfaire – [William], [Igor], and several other members managed to connect it as a monitor directly off a Raspberry Pi. The end-goal is the world’s smallest MAME cabinet (smaller by almost half than this LCD one).

As Canada followed the US and stopped broadcasting analog back in 2011, it became quite a challenge to feed the screen a video source. They disclosed early that the easiest solution would just be an RF transmitter on the Pi and then tune the micro-set to that channel. Too easy. They wanted something elegant and challenging so they went digging into the circuitry to find a place to insert a composite video signal directly.

The real story here is their persistence at reverse engineering. The PCB was folded like a cardboard box to fit in the original case, making large portions of the circuitboard and wiring inaccessible. Even when they managed to trace the signal to what they thought was the appropriate chip (marked C80580), they could not find any information on the 30 year old chip. Noting that every other chip on the board was Panasonic and started with “AN5”, [Igor] suspected the mystery silicon was just renamed and went through every single datasheet he could find with that prefix. Combined with form factor, pin count and purpose, his sleuthing was rewarded with a guess for a match – the AN5715. His hunch was correct – using that datasheet led him to the answers they required.

Then they just had to figure out how get the composite signal the Pi outputted into something the chip would use to display the correct image. There were no shortage of challenges, failures and dead ends here either, but they had help from the rest of their membership.

Their project log is an interesting narrative through the process and in the end of course, it worked. It is displayed beautifully with a clear acrylic case and ready for a cabinet to be built.

PoughkeepsieMMF

First Ever Poughkeepsie Mini Maker Faire

This past Saturday was the first Mini Maker Faire held in Poughkeepsie, NY. Although it was the first in the area, the event went extremely well having over 60 makers and countless attendees. It was held at the Poughkeepsie Day School and made use of a large percentage of the indoor area.

roboticarm

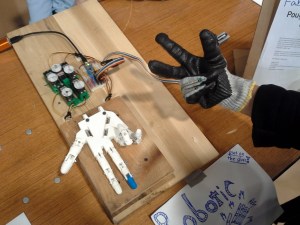
Ninth graders of the hosting school [Liam], [Johnson] and [Matt] were proudly displaying some of their projects. One of which was a robotic hand controlled by a glove the user wears. Flex sensors sewn into the glove detect how much each finger is bent. That information is read by an Arduino which then commands 5 independent servos to pull string ligaments to bend the fingers of the 3D printed robotic hand. The kids give credit to this Instructable which was the inspiration for their desire to build such a project.

No Maker Faire would be complete without some 3D printers. On hand was a father/son team that built a Mini Kossel. The design is simple and elegant, and apparently assembly is no problem for even the youngest maker. 3D printing guru [Ed] was on hand with his MakerGear M2 to show some practical uses for 3D printers. They are not just for making Yoda heads! [Ed] also gave a presentation on the matter, explaining why 3D printing is important and useful to people, even the common non-techno-nerd consumer.

Continue reading “First Ever Poughkeepsie Mini Maker Faire”

ASTROGUN Is Like Asteroids On Steroids

Astrogun

As the Jerusalem mini Makerfaire approached, [Avishay] had to come up with something to build. His final project is something he calls ASTROGUN. The ASTROGUN is a sort of augmented reality game that has the player attempting to blast quickly approaching asteroids before being hit.

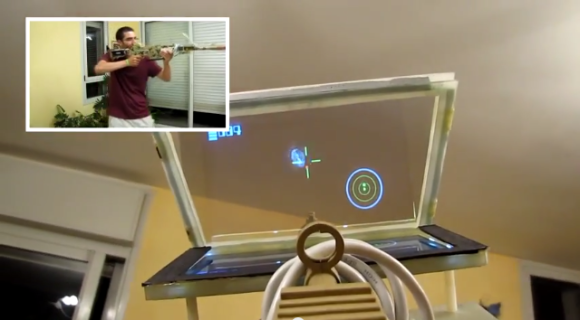
It’s definitely reminiscent of the arcade classic, Asteroids. The primary difference is that the player has no space ship and does not move through space. Instead, the player has a first person view and can rotate 360 degrees and look up and down. The radar screen in the corner will give you a rough idea of where the asteroids are coming from. Then it’s up to you to actually locate them and blast them into oblivion before they destroy you.

The game is built around a Raspberry Pi computer. This acts as the brains of the operation. The Pi interfaces with an MPU-9150 inertial measurement unit (IMU). You commonly see IMU’s used in drones to help them keep their orientation. In this case, [Avishay] is using it to track the motion and orientation of the blaster. He claims nine degrees of freedom with this setup.

The Pi generates the graphics and sends the output to a small, high-brightness LCD screen. The screen is mounted perpendicular to the player’s view so the screen is facing “up”. There is a small piece of beam splitting glass mounted above the display at approximately a 45 degree angle. This is a special kind of glass that is partially reflective and partially translucent. The result is that the player sees the real-world background coming through the glass, with the digital graphics overlaid on top of that. It’s similar to some heads-up display technologies.

All of the electronics fit either inside or mounted around a toy gun. The display system was attached with a custom-made fiberglass mount. The code appears to be available via Github. Be sure to watch the video of the system in action below. Continue reading “ASTROGUN Is Like Asteroids On Steroids”

New And Improved DIWire Bender

[youtube=http://www.youtube.com/watch?v=xrr4peibbNI&w=470]

The DIWire bender we saw last summer made its way to Maker Faire this year with a new and improved version that is now able to bend steel even more accurately than the previous aluminum-bending version.

I chatted up [Marco Perry] (above, obviously), and he explained a new feature of the DIWire bender that makes soldering or welding creations made out of CNC bent wire even easier. The new machine features a sharpie that precisely marks where the wire should be welded.

The folks behind the DIWire – Pensa – have a ton of really cool wire sculptures at their booth at Maker Faire, quite incidentally within spitting distance of Hackaday’s Red Bull booth. Be sure to check them out if you’ve got a chance.