As anyone who has lusted over the technical specifications for Canon’s new Digital Rebel XSi knows, the capabilities of the average point and shoot camera are severely limited. Using the CHDK firmware hack, the features of Canon point and shoot cameras can be significantly expanded, allowing for ultra-high speed photography, very long exposures, time lapse photography, and RAW capture. This How-To provides a guide to our experiences using the CHDK firmware, and shows just how easy it is to get more out of a point and shoot than ever thought possible.
Installing CHDK
The first step is to install the CHDK software. Our friends at Lifehacker recently ran an article covering exactly that, so we won’t bother repeating the instructions. Be sure to install the Allbest build, it has all of the nice features.
After installing, you’ll want to have the firmware autoload when you boot up your camera. To do so, open up the main CHDK menu by pressing your ALT button, then the MENU button. Scroll down to “Debug parameters”, then click on “Make card bootable…” After it is done, turn off your camera, remove the SD card, and toggle the write protect switch. When this switch is toggled, the camera will automatically boot into CHDK (you’ll still be writing to it).
Taking long exposures
Long exposure photography is appreciated for its soft, sometimes surreal images of (usually) night scenes. Many point and shoot cameras only allow exposures of 15 seconds, but with CHDK, you can take photos at up to 64 seconds.

Navigate to CHDK’s main menu and find Extra Photo Operations. In Extra Photo Operations, change the Override Shutter Speed value to the shutter speed you wish to shoot at, such as 64 seconds. Scroll down and change the Value Factor from OFF to 1.
Though the camera will not indicate the modified shutter speed, the changes will take place. Just take a picture as you normally would. Be sure to have your camera set to manual mode. Taking photos of moving things works best for long exposures: try subjects like the ocean, windy trees, and traffic. Additionally, using neutral density filters, you can even take long exposures in the day time!
Taking ultra-fast exposures
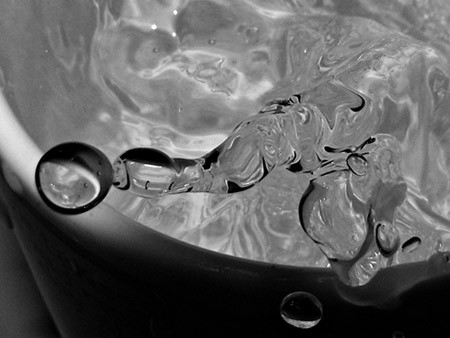
Just as you can override the shutter speed for long exposures, you can take ultra-fast exposures as well, at up to 1/100,000 of a second with some cameras. Flash will sync at up to 1/60,000 of a second, and you’ll need flash with such short exposures. We were unsure how useful or easy this would be to use, but the results surprised us: in just a few minutes we were able to capture nice looking water droplets, without a hint of motion blur.
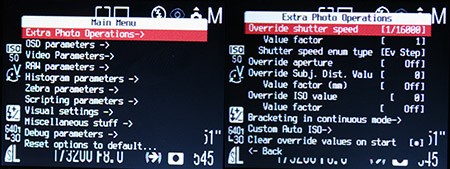
Navigate to CHDK’s main menu and find Extra Photo Operations. In Extra Photo Operations, change the Override Shutter Speed value to the shutter speed you wish to shoot at, such as 1/16,000 of a second. Scroll down and change the Value Factor from OFF to 1. Be sure to have your camera set to manual mode.
Note that the minimum shutter speed is restricted by the aperture value you have selected in the camera’s manual settings. The wide end (lower numbers), can usually only shoot at down to 1/8000 of a second, while the narrower end (higher numbers) can shoot for the full range.
Prefocus before taking the picture, either by using manual focus mode, or by holding the shutter button halfway down. Though the camera will not indicate the modified shutter speed, it will use the short shutter speed. There are many different things that can be done with high speed photography: capture water droplets, capture explosions, or even capture a bullet leaving a gun. All of these are possible with CHDK.
Running scripts
The real power in CHDK comes from running user made scripts. The first script we will look at is an intervalometer, which allows you to take many photos over a period of time. We used it to easily create a time-lapse video.
Copy and paste this script into a new document, and save as ult_intrvl.bas to your computer. Then, plug in your camera’s SD card, and copy ult_intrvl.bas to /CHDK/SCRIPTS/.
To use the intervalometer, navigate to the main CHDK menu, find “Scripting parameters”, and click “Load script from file”. Find ult_intrvl.bas, and press set. Then, scroll down and adjust the script parameters: the delay until the first shot is taken, the number of shots you wish to take, the interval between each shot, and whether or not you want it to take an “endless” number of photos. Then, exit the menu, but leave your camera in ALT mode, and press the shutter button to start the script.
The video above was created by taking approximately 700 shots at 15 second intervals over 2 hours and 45 minutes. Just set your camera on a tripod or another steady surface, and start the intervalometer. Using QuickTime Pro, go to File>Open Image Sequence to convert the hundreds of separate images into a movie. For space and processing considerations, we recommend setting your camera to a low-resolution mode before starting the intervalometer.
Exposure bracketing
Exposure bracketing allows you to take many pictures at slightly different exposures nearly simultaneously. You can use this to correct errors in the camera’s autoexposure, or merge exposures for HDR photography. Many higher end Canon PowerShot’s have exposure bracketing built in, but for those that don’t, CHDK has the answer.
Like with the intervalometer script, simply copy and paste this script into a new text file. Name it bracketing.bas, and place it in the /CHDK/SCRIPTS/ folder of your SD card.
Then navigate to the main CHDK menu, find “Scripting parameters”, and click “Load script from file”. Find bracketing.bas, and press set. Then, scroll down and adjust the script parameters. The step size is the difference between each image taken, in 1/3 EV steps, the correction is the EV of the middle image taken. The only slightly tricky part here is that first parameter is the (number of images – 1)/2. This means that if you want three pictures, it must be 1, five is 2, seven is 3, and so on. To run the script, exit the menu, leave the camera in alt mode, and press the shutter button.
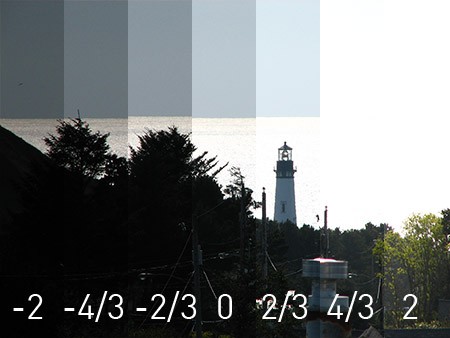
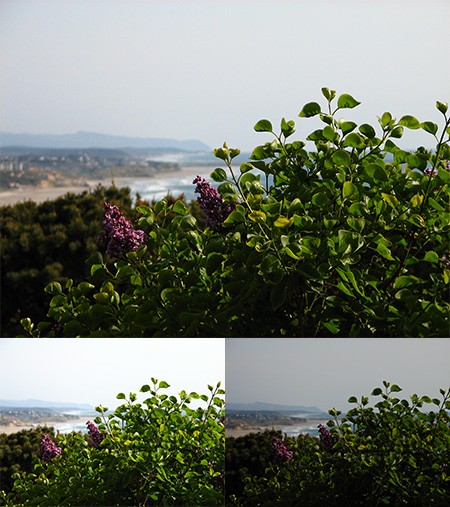
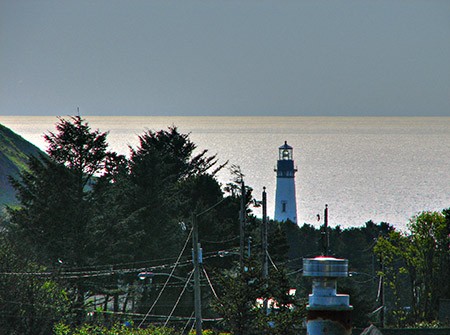
With these different exposures, you can create HDR tone-mapped images, that show very bright and very dark regions exposed properly. For example, taking the seven different images of the lighthouse above into an HDR program such as Photomatix, optimizing settings for realism, produces this result:
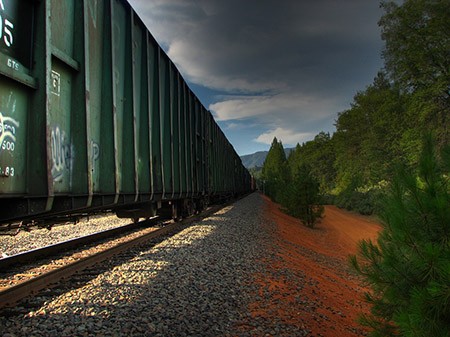
You can also use HDR to produce more dramatic photos, such as this train. It is all in how you process the images.
There is a lot that can be done with HDR, from extremely vibrant photos, to the scarily surreal, such as this one below from Till Krech.
 ..
..
For more information on HDR photography, Stuck In Customs has an excellent tutorial.
Taking RAW photos

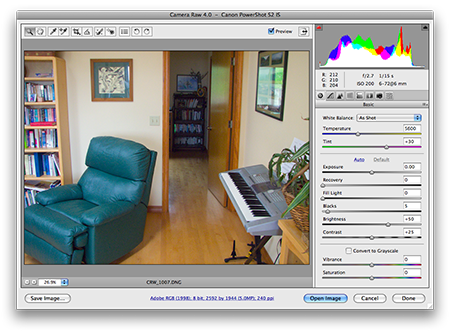
RAW photos can be extremely useful to digital photographer. They enable you to extract more information from bright highlights in an image, and RAW gives the you complete control over white balance. For example, in the above photo the JPG had an incorrect white balance, which was easily corrected using the RAW image. While DSLRs offer 12 bits of data in RAWs, most point and shoot cameras can only provide 10, meaning that even with CHDK, you won’t be able to extract as much information from highlights as you could with a DSLR. Still, RAWs are very useful for having precise white balance control.
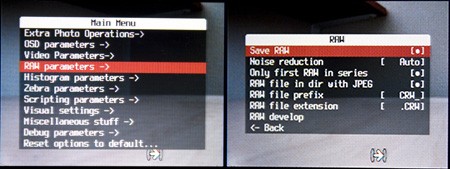
In the Raw Parameters menu, enable “Save RAW”, and adjust the other parameters as shown. Now, you can take photos as normal, and a RAW will be automatically saved with your JPG. The RAW file will take quite a bit a more space than the standard JPG, so your camera will not be able to correctly display remaining space on the SD card.
Processing RAW photos
To process your RAW photos, you’ll need to convert them to the Digital Negative format, DNG. The DNG4PS-2 software can do this for these cameras: A610, A620, A630, A640, A710 IS, S2 IS, S3 IS, A700, G7, A560, A570 IS, IXUS 700, IXUS 70, IXUS 800, A720 IS, S5 IS, IXUS 950, A650 IS, A460, SD800 IS, A530, A540. You can also process the files using UFRaw or dcraw, though that is much more difficult.
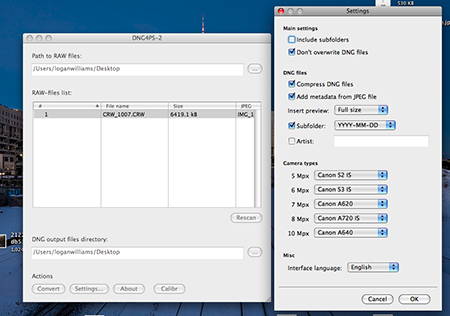
Open DNG4PS-2, then go to settings. Adjust the model settings based on how many megapixels your camera is. Next, press OK, and find the path to RAW files option. This is not the location of the file that you wish to convert, but the folder that contains the files. When you have selected the correct folder, press “Convert”.
The DNGs will be in a folder marked with today’s date, and from there, you can process them in Lightroom, Aperture, Photoshop, or whichever RAW processing software you prefer.
Adding a battery meter
Tired of have the low battery warning sneak up on you? CHDK can add a battery meter to your camera, though the configuration depends on what type of camera you have.
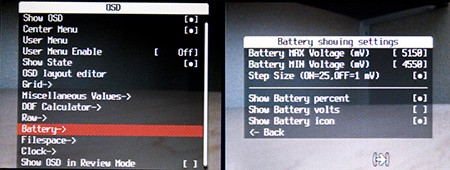
To enable it, go to OSD parameters in the main menu, then to Battery. Edit the parameters so that they are as they appear above, if you have a camera with 4 AA rechargeable batteries. Cameras with 2 AA rechargeable batteries should be about half of that. For other power sources, experiment to find the best value.
Writing your own scripts
CHDK uses a very simple BASIC-like language called UBASIC. It has all of the features that one would expect from any language, but there are many camera specific features.
Input/output
Each script begins with a special header, that provides information and control to the user.
@title Intervalometer
@param a Number of shots
@default a 10
@param b Interval (Minutes)
@default b 1
In this header, the title of the script is declared, as are two user adjustable parameters. The syntax is simple: @title declares a title, @param par declares the name and label of a parameter, and @default [par] declares the default value of a parameter. Scripts can only receive input through the header, at the beginning of their execution.
To output information to the user, the print command is used: print "Num shots: ", a will print the number of shots, as inputted in the script header. Note the use of the comma to seperate text from variables. The print command is limited to 25 characters of text. To clear what has been printed, use the cls command.
Standard program flow
let a = 2
for x=1 to 10
gosub "display"
next x
:display
rem print even numbers
if x % a = 0 then print x
return
This block of code demonstrates many of the logic features of the UBASIC language. To assign values to variables, use the let command. You can also see a for loop and a subroutine. Note the use of the rem command to insert comments, and the single line if statement. UBASIC supports most standard mathematical comparisons, including +, -, *, /, %, <, >, =, <=, >=, <> (not equal to), &, |, ^ (xor).
Camera control
The meat of UBASIC is in its many commands for controlling the camera:
shoot- Takes a photo
click/press/release "button"- Clicks (press and release), presses, or releases on the cameras buttons. The following are available:
up, down, left, right, set, shoot_half(depresses the shutter halfway), shoot_full, zoom_in, zoom_out, menu, display, print, erase, iso, flash, mf(manual focus), macro, video, timer. wait_click timeout- Waits for a button to be pressed, then continues. The timeout value is optional.
is_key x "button"- Immediately follows a
wait_clickcommand. If the last button pressed is"button", then the variable x is set with the value of 1. Ifwait_clicktimed out, then"no_key"is used as the button name. set_tv val- Sets the shutter speed to
val. Note thatvalis not “1/1000” or something similar, but rather an integer value. Each increase in the integer value corresponds to a 1/3 EV increase. The absolute mapping between integer values and shutter speeds varies between cameras, but tables are available here. This, and all following commands must be used with the camera in manual mode. set_tv_rel val- Sets the shutter speed relative to the current shutter speed. Example:
set_tv_rel 0-1increases the shutter speed by 1/3 EV. get_tv target- Sets
targetequal to the current shutter speed. set_av val, set_av_rel val, get_av target- With the same syntax as shutter speed commands, these adjust aperture settings.
set_zoom val, set_zoom_rel val, get_zoom target- Just like
set_tv/set_tv_relcommands. Inset_zoom_rel,valis +/- the relative change. Zoom values range from 0 to 8 or 14 for A-series cameras, and 0 to 128 for S-series cameras. set_zoom_speed x- S-series only. Sets the zoom speed, at
x% of maximum speed.xmay vary between 5 and 100. set_focus x, get_focus targetx/targetis distance in millimeters.set iso x, get iso targetx/targetis one of the following values:0 (Auto ISO), 1 (50/80), 2 (100), 3 (200), 4 (400), 5 (800), -1 (High ISO).
Where to go from here
Try checking out the CHDK wiki, for more features then are even printed here. Finally, take photos! The most important thing that you can do to improve your photography skills is to take lots of photos.


Now THAT is a freakin hack-a-day article. I LUV CHDK. I recently discovered it and put it to use with the motion detection on my SD 850 IS. My son had a science project about hummingbirds. We loaded up CHDK with the lightningb script and set the camera on a tripod near our hummingbird feeder. Everytime a hummy flew into the view of the camera, it snapped a picture. I want to use the time lapse next, and also mess with the bulb shutter for use with my telescope. And OMG… is it really that hard for canon to include the battery meter on these powershots? Aparently not. And BTW.. using CHDK does not void your warranty. It is a temporary firmware change that reverts as soon as you turn the camera off and remove the battery. You are not actually changing/overwriting anything in the camera. There is a letter from canon stating such on the chdk site.
Why does the A520 get no love?
I guess I will have to pick up one of the supported cameras, and leave the wife’s A520 alone.
If only something like this existed for Kodak cameras…
Yeah, me too. I recently fetched a z812 “bridge camera” from ebay and am quite disappointed by too much toy’i’ness. This hack on the other hand looks like my kind of fun, maybe I will try this!
Excellent write up guys !!
http://www.hackaday.com/2007/05/06/powershot-firmware-hacking/
I like the hack, but again, it’s already been here. I like the firmware, got it on the camera after reading about it last time.
It may have been covered before, but this one blows the other away. I have been using CHDK on my S5IS for a month or so now and I love it, I have it loaded on all of my cards so I have it at my fingertips.
Thanks for the detailed post!
The CHDK for the Canon S5 IS recently came out. Anybody know how to modify it so that I don’t have to go through the options all the time to change the shutter speed but instead do it just by pressing the left or right buttons?
Howdy, we really liked the picture of the train and wondered where you got it from (did you take it?).
Thanks!
Nick
can i from where have that program ?
i use my graphics in my site http://www.car1001.com.
Thanks.
@nick: yes, I took the picture of the train. Thanks, I appreciate your praise.
Let me know when they get it working on the new cameras. My SX100IS needs some hackin!
@10, Logan:
Would you be able to post a hi-res copy of that train picture somewhere (imageshack? photobucket?)? It’s really great!
@12, califrag: it’s on my flickr: http://flickr.com/photos/loganwilliams/733353873/sizes/l/
I probably have a higher res version somewhere, but I’m not sure where.
I found chdk invaluable for this exposure bracketing project i was working on.
http://bpowah.googlepages.com/hdrandpythonpil
I’m having problems using the superfast shutter speed. I can set it to a really high speed, no problem, as per your tutorial, but when I take a picture either it’s completely black if I have the flash turned off or, if the flash is on, I get a completely blown out white picture.
@Rager, yeah, it was covered 1 year ago. This write up is much better, and the CHDK group is farther along.
Can’t wait to get myself one of the cameras.
I gotta say, it may have been covered before, but this is many times better.
These detailed write-ups are really good! I noticed yinz took the hint from the survey- not only has the number of hard hacks on here gone up daily, it seems, but the quality is way up as well. I’m really, really enjoying Hackaday lately!
Keep up the great work.
I’m glad firmware for the SD800 was finally released. The CHDK hack was the main reason I chose a Canon. 28mm RAW that fits in my pocket, can’t beat it.
I also appreciate the detailed instructions for running the scripts.
is it just canon camera can use this hack??
Outstanding! I recently picked up a A720 (which I love) and put the chdk on there, but couldn’t really figure out a lot to do with it, and couldn’t get any of the programs I found to convert the raw images… now I’m converting my raws with the DNG4PS-2 and I’m really excited about trying some of this when I get home… I’d taken the chdk off, but I’m definitely going to put it back on. Thanks for a great article.
Thanks for a fantastic article. I had heard about this program but haven’t had time to read all the documentation, 5 minutes after reading this article I was running scripts on my camera and taking cool pics of dripping water at 1/16000 shutter speed. I can now do some really cool stuff with my cheapie Canon point & shoot digicam!
Excellent writeup! And you know what? A great gesture to the CHKD team would be to let them include your howto on their own wiki, that would be a great contribution to the project. What do you think?
EXCELLENT post. Great job!
Fantastic article! Clearly written with good examples and ideas. Thanks!
Hi there… Sorry, I´m german, may english is not the very best.
I´ve got a question/suggestion to create the possibility of making own “bullet-Time-Movies”: Is there any hack/possibility to connect several cameras (e.g. 32) and take 1 picture with each camera at the same time (e.g. via “remote capture”)?
The Result has to be 32 images of an objekt, taken at the same time, so that you can move arround the objekt, while “time ist standing still”. You know the Effect from Matrix.
Here is an example of this effekt, made with very expensive Cameras. I hope, it should also work with low-cost cameras.
http://www.colorshots.com/smart_colorshots.mov
Can anybody help me?
markus,
One way of trying to achieve that result would be multiple cameras controlled with a single remote control. CHDK can use scripts to have an electrical signal through the USB connection trigger the shutter. This approach could, I guess, be scaled up to a bank of cameras. If you search the web for terms such as CHDK and remote control, you can find some details.
wow this looks amazing, dose anyone know if itl work with my cannon powershot A570 IS ?
hi
I have an old kodak z700 camera, which i intend to use with my telescope….
However, sadly the kodak z700 only allows shutter speeds from 8 sec to 1/1000sec
I wish i could change the firmware by editing it somehow, to allow me to set shutter speeds as much as 30-40 seconds … as otherwise, the camera will be useless as an eyepiece for a telescope…
Kindly help ,
I am willing to take a risk by editing the camera firmware so as to allow it to capture loooong shutter speeds :)
Please!
I am desperate !
Hi Markus. I am attempting to do the same i.e. attempt a Matrix-style bullet-time with multiple chdk cameras.
Can you send me an email – amish153 at hotmail dot com ?
We should exchange notes and help each other achieve this.
Thanks!
great post on a great innovation. h.a.d at its best.
wow. that is one heck of a lot of coolness. my next camera might be a canon now. great work to the folks who made this one happen.
I echo what was said above. The override shutter speed does not work for me. My shutter speed becomes SLOWER when I use the hack. There’s no way to do those super fast shutter speed shots of water droplets that are shown. I give up.
will my sd790is canon support CHDK?
I am amazed with it. It is a good thing for my research. Thanks. ^_^
I wish I was able to follow this CHDK stuff to make my EOS XTi have 3200 iso. I take pictures of the kids sports at school and the iso I get standard is at best blurry on the good action shots. Do you put it on every memory card and then lose it everytime you take the battery out to charge??? The local paper’s photog had a 3200 iso camera and the paper’s pictures rock …daily!!! Anyone have simple directions for a not so technologically advanced mom? Thanks..:)
Clearly written with good examples and ideas. Thanks!
Hi i have a canon ixus100is cam..
can i install CHDK for my ixus100is?
valuable information and excellent design you got here! I would like to thank you for sharing your thoughts and time into the stuff you post!! Thumbs up!
I agree with the others; this is the best introductory write up for CHDK that I have seen. Thank you
good day guys!CHDK is great!! i’ve been using this to my s5is and the raw format is great.guys i have a question,can i use notepad to make a script?i really don’t know how to use the script, can any one help me?tnx in advance.is there a script where you can use the red eye reduction flash?(the one with little flashes)because in manual mode the flash is one blow w/c causes harsh light.tnx guys!
Thanks for the tips. I’ve often struggled in this area to create a campaign that works.
Hi,
Many thanks for an introduction to wonderful world of CHDK. Its a whole new world for me.
I am in a process of making a motorized panoramic head. This head can be used for 360×180 and timelapse. I can attach cable release to my circuit. But how can i use CHDK like for 360×180 i have to shoot many pictures. Camera moves, clicks, waits and keep repeating this process. I want HDR options..like whenever i click camera takes pics of my exposure values….I dont have to load script again n again..
other task
How can I know camera focused or not than fire. how can CHDK help me….I am not a scripting man so please help me
Is there a script that would allow me to change the file names in my Canon G11? I use two cameras and they both use the same file names. For example, both cameras create a file named “IMG_2147.” I run into problems when I transfer the files from the camera to the computer and encounter identical file names. I would like to change one of the cameras so that it creates image files with a different name such as “PIC_2147.”
The EOS 450D is NOT ported, there’s NO CHDK or hacks available for this camera.
Why have u written about Digital Rebel XSi?
It didn’t supported.
The best explanation so far found the operation of CHDK, thank you very much for the clarity
I’ve been using CHDK on my A-590is with awesome results! This is where I found the info originally, so THANK YOU!!
Roman, is that all you’ve got, just bitchin? The author wrote about the Rebel XSi as an example of what point and shoot owners would LIKE to have. CHDK adds capability to Powershot cameras to make them LIKE the Rebel XSi… reading comprehension dude, you need some.
For those of you making time lapse: first click your DISPLAY button until your screen goes off. THEN click your ALT button to activate your script. THEN hit the shutter – this will save greatly on your battery. (At least on my SD1000 I can’t turn off the display if I’m in ALT mode. I assume it’s that way for others.)
I have tried without success to access the code from my memory card. I have a Canon SX40HD. I take a photo, I then go to the play, displaying the photo, I turn on my camera then press function set and disp at the same time, nothing happens, anybody know what I am doing wrong>
just struggled with the sx40 setup issue – and then found this quick and easy card setup buried as a note in the chkf user quick start guide. it worked for me!
2011 camera releases, including the SX40HS, can work with SD cards formatted up to 32GB – it is no
longer required to partition the card to have CHDK autoboot.
The following steps should work on any card up to 32GB
– format the card in the camera
– copy the full CHDK download (unzipped) to the SD card (DISKBOOT.BIN, and PS.FI2 plus the
CHDK directory)
– lock the card and start the camera with the rear playback button
– press the Menu button and select ‘Firm Update…’ from the bottom of the first menu
– when CHDK reboots enter mode
– select ‘Make Card Bootable’ from the ‘Miscellaneous Stuff’ CHDK menu
– restart the camera and CHDK should now autoboot
Thanks to philmoz.