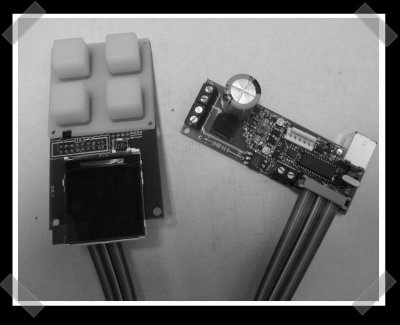
[Nathan] sent in his toaster oven reflow controller. He’s using a Triac to drive the heating elements, a thermocouple to monitor temperature and a PIC controller to run the show. I’m giving him extra points for style on the control pad. Hopefully he’ll have time to put out a complete write up when he’s got it finished. You can check out the project photos here.


5 thoughts on “Toaster Oven Reflow Controller”
Leave a Reply
Please be kind and respectful to help make the comments section excellent. (Comment Policy)


Sparkfun.com has had a kit and tutorial on how to do a reflow controller for some time now.
Elektor has had a kit and tutorial on how to do a reflow controller for some time now too.
http://www.elektor.de/jahrgang/2006/januar/smd-lotofen.63901.lynkx
http://thomaspfeifer.net/backofen_smd_reflow.htm
I purchased a toaster controller from articulationllc, and another from another company to try them both out. I played with the articulation one, but not the 2nd–because I’m not convinced they’re needed at all. I had a lot of success with a $20, 2 burner, no convection small oven by just turning it on max, waiting for the joints to reflow, counting to 15 and then opening the door all the way.
If you look at recommended temperature profiles from paste / component manufacturers, they have guidelines for the various zones (pre-heat, soak, reflow, cool down) of a typical reflow process that include things like max. temperature rise, etc. Typical numbers are 3 deg. C / sec ramp up and 6 deg. C / sec cool down.
In my testing, the toaster ovens couldn’t come close to the heating limit, and opening the door wide open at the end didn’t violate the cool down rate, either. Temperature was measured with thermocouples in air and also cemented directly to the PCB.
So, from the toasters I’ve played with, there’s no need to throttle the toaster with a controller since full power “on” is about as close as you’re going to get to the recommended profiles as possible. Not to mention that a toaster oven is not a very controllable system in the first place–the controller isn’t going to be able to cool it down automatically without some mechanism to open the door and blow air inside.
My first oven was a larger, 4 burner convection GE (1440Watts) didn’t work at all, whereas the smaller $20 (1000 Watts) one worked great, probably because there was less volume to heat. From what I’ve read and experienced, you want something that can go from 0-200 deg C in about 5 min.
All that being said, I’m sure there are situations where a controller is helpful. For instance, if you have big connectors (plastic or metal) or other large components, or BGAs, and the profile is somewhat critical to achieve reflow on all the parts without burning or melting others. This applies more-so to lead-free. While I doubt the controllers can achieve a particular profile on the first pass, through trial and error you could arrive at something workable, and then have it re-played without personal involvement. It’s nice to easily record the profile, too.
Anyone have a case where they actually needed a controller?
The cool button on this guy’s controller might outweigh all these arguments.
Here’s an expanded writeup of my toaster oven experience, with a summary of common reflow profile regions and requirements:
http://www.curiousinventor.com/guides/Surface_Mount_Soldering/Solder_Paste_and_Toaster_Oven
The relevant parts of industry reflow specifications are in this pdf: http://www.intersil.com/data/tb/TB389.pdf
I’ve been playing with my toaster oven for a few months now, and I certainly haven’t seen a need for a controller. My experiences are very similar to Scott’s. I hooked up a temperature probe and checked it out, close enough for my purposes. I’ve done both leaded and lead-free solders with no problems at all. It’s just a small oven with top and bottom elements, the cheapest we could find. I turn it to about 500F and watch the show. It’s been working fine on parts down to 0402 and 0.5mm lead pitch, but I haven’t needed to do anything finer yet.
If there’s any hack a toaster needs, it’s telling you via obex that your toast is done and reporting wattage.